> ## Documentation Index
> Fetch the complete documentation index at: https://sequence-0fb8d9e6-api_docs.mintlify.site/llms.txt
> Use this file to discover all available pages before exploring further.
# How to Manage Item Metadata in Sequence Builder
> This guide explains how to manage token metadata in Sequence Builder with the help from Pinata for IPFS hosting.
## Introduction
Following this guide, you can easily manage token metadata for your contract items in Sequence Builder, with a little help from [Pinata](https://www.pinata.cloud/) for IPFS hosting.
## Step 1: Prepare Your Token Images and Metadata
First things first, gather all your token images. For each token, you'll need a metadata file named `id.json` (like `1.json`, `2.json`, etc.). These files should look something like this at a minimum:
```json theme={null}
{
"name": "Token Name",
"description": "Token Description",
"image": "ipfs://"
}
```
As you can guess, you can build from these basics. You could have your unique item attributes embedded in this token and generated on the fly.
## Step 2: Set Up on Pinata.cloud
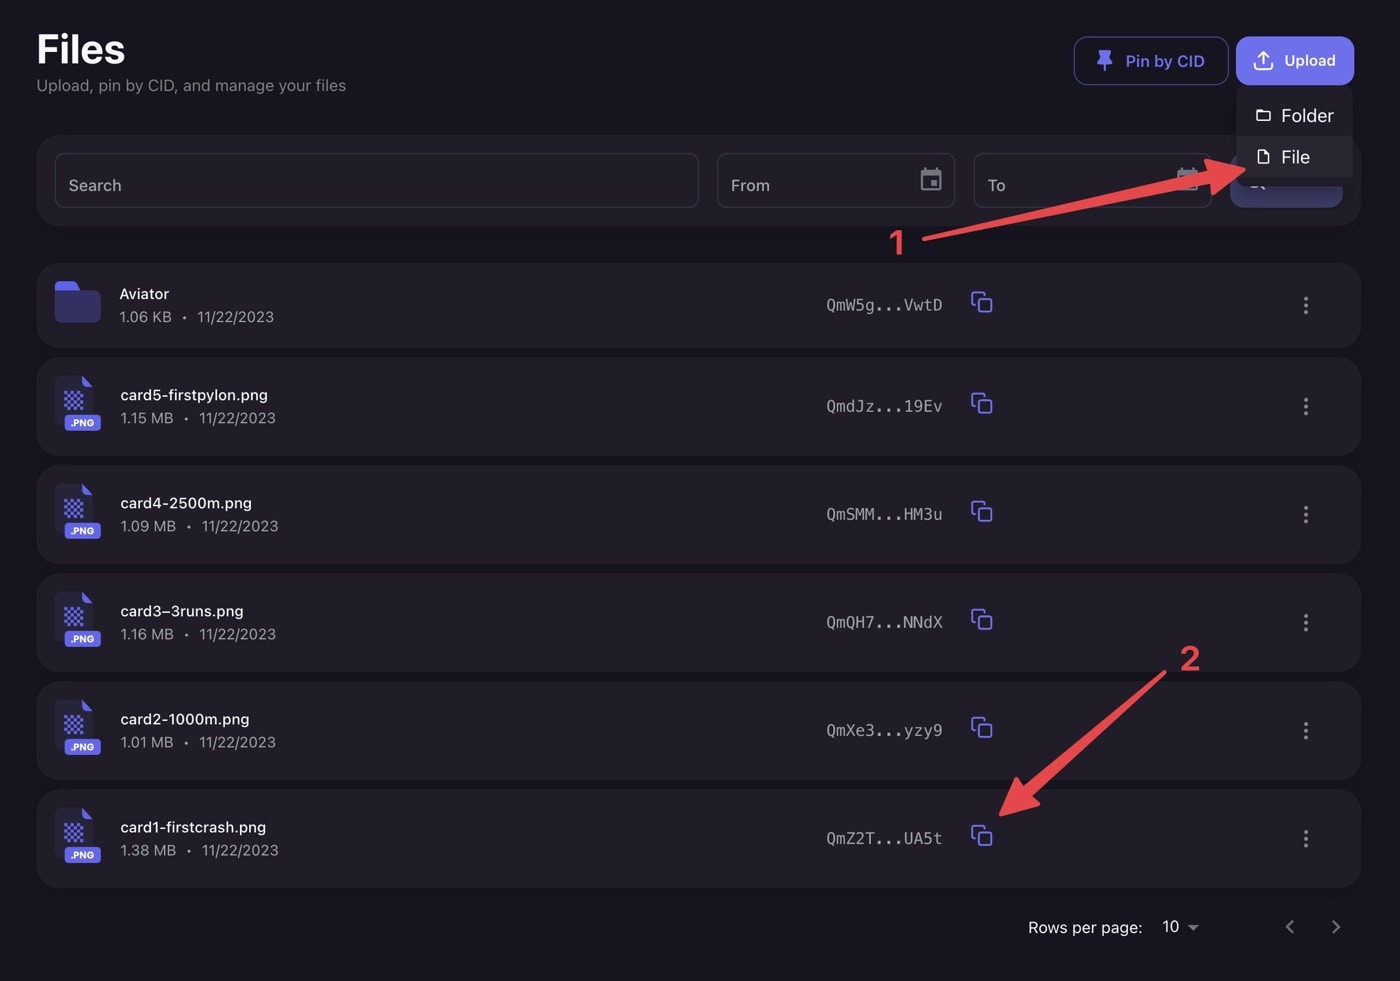
Head over to [Pinata.cloud](https://www.pinata.cloud/) and create an account. Upload each of your token images as separate files. Next, update the metadata JSON files with the `ipfs` address for each token. To do this, simply copy the CID (Content Identifier) for each file from Pinata and paste it after `ipfs://` in your JSON files. It should look like this:
```json theme={null}
{
"name": "Token Name",
"description": "Token Description",
"image": "ipfs://QmdJzQExj2wnNY7pNNn4KauzckjH4vA5xhoxmmis919Ev3"
}
```
 ## Step 3: Upload Your Metadata Files
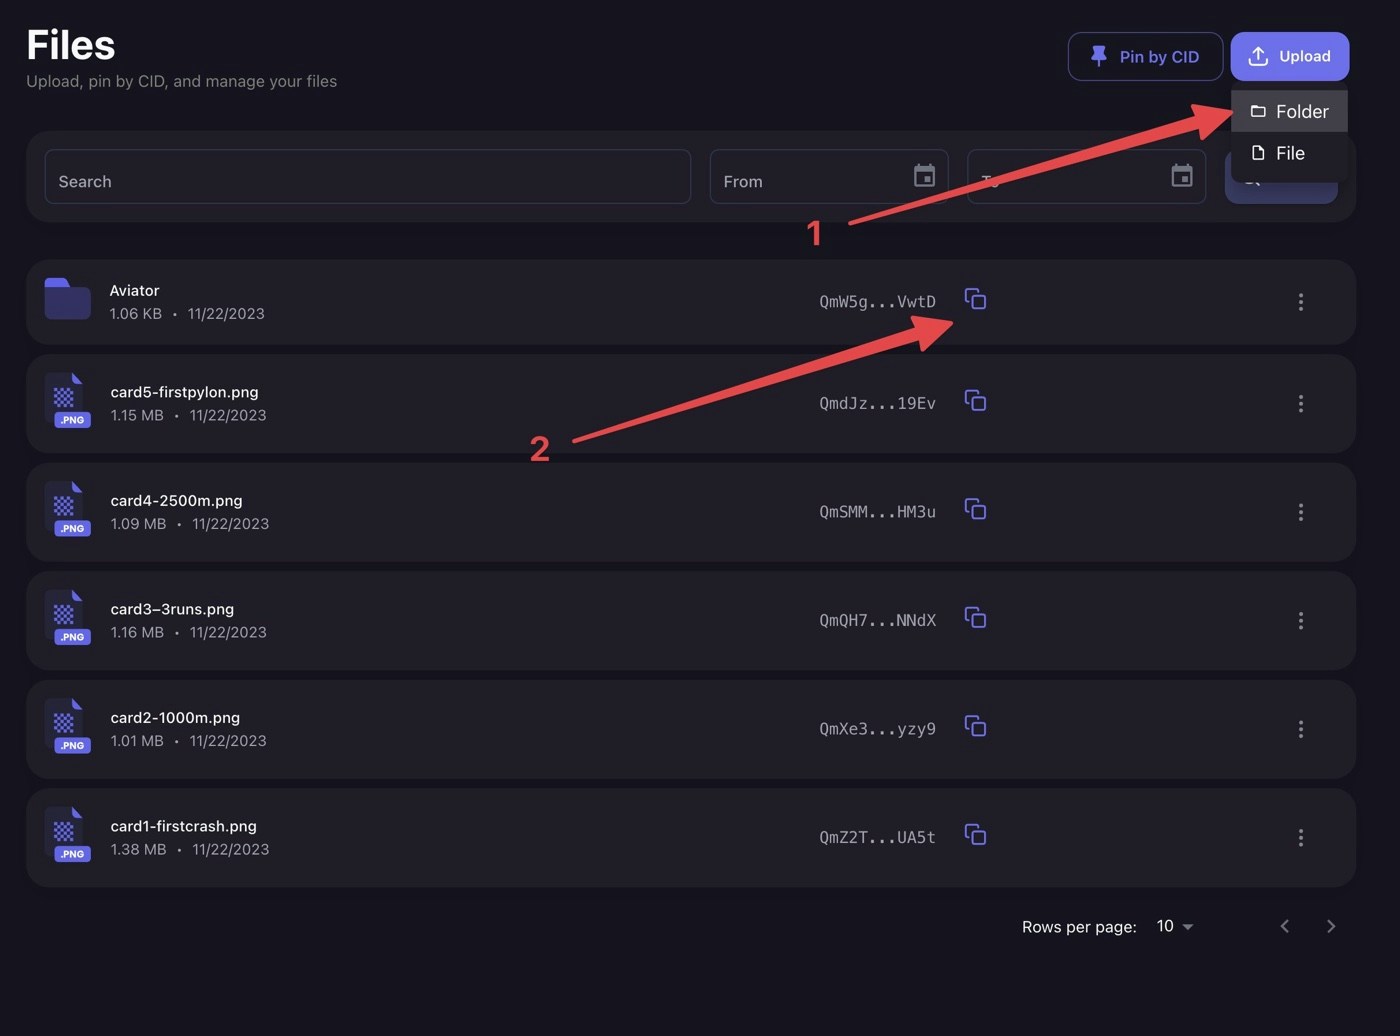
Now, gather all your JSON metadata files into a single folder on your computer. Use Pinata's 'Upload > Folder' feature to upload this folder. Then, copy the CID for the entire folder.
## Step 3: Upload Your Metadata Files
Now, gather all your JSON metadata files into a single folder on your computer. Use Pinata's 'Upload > Folder' feature to upload this folder. Then, copy the CID for the entire folder.
 ## Step 4: Get the Folder URL
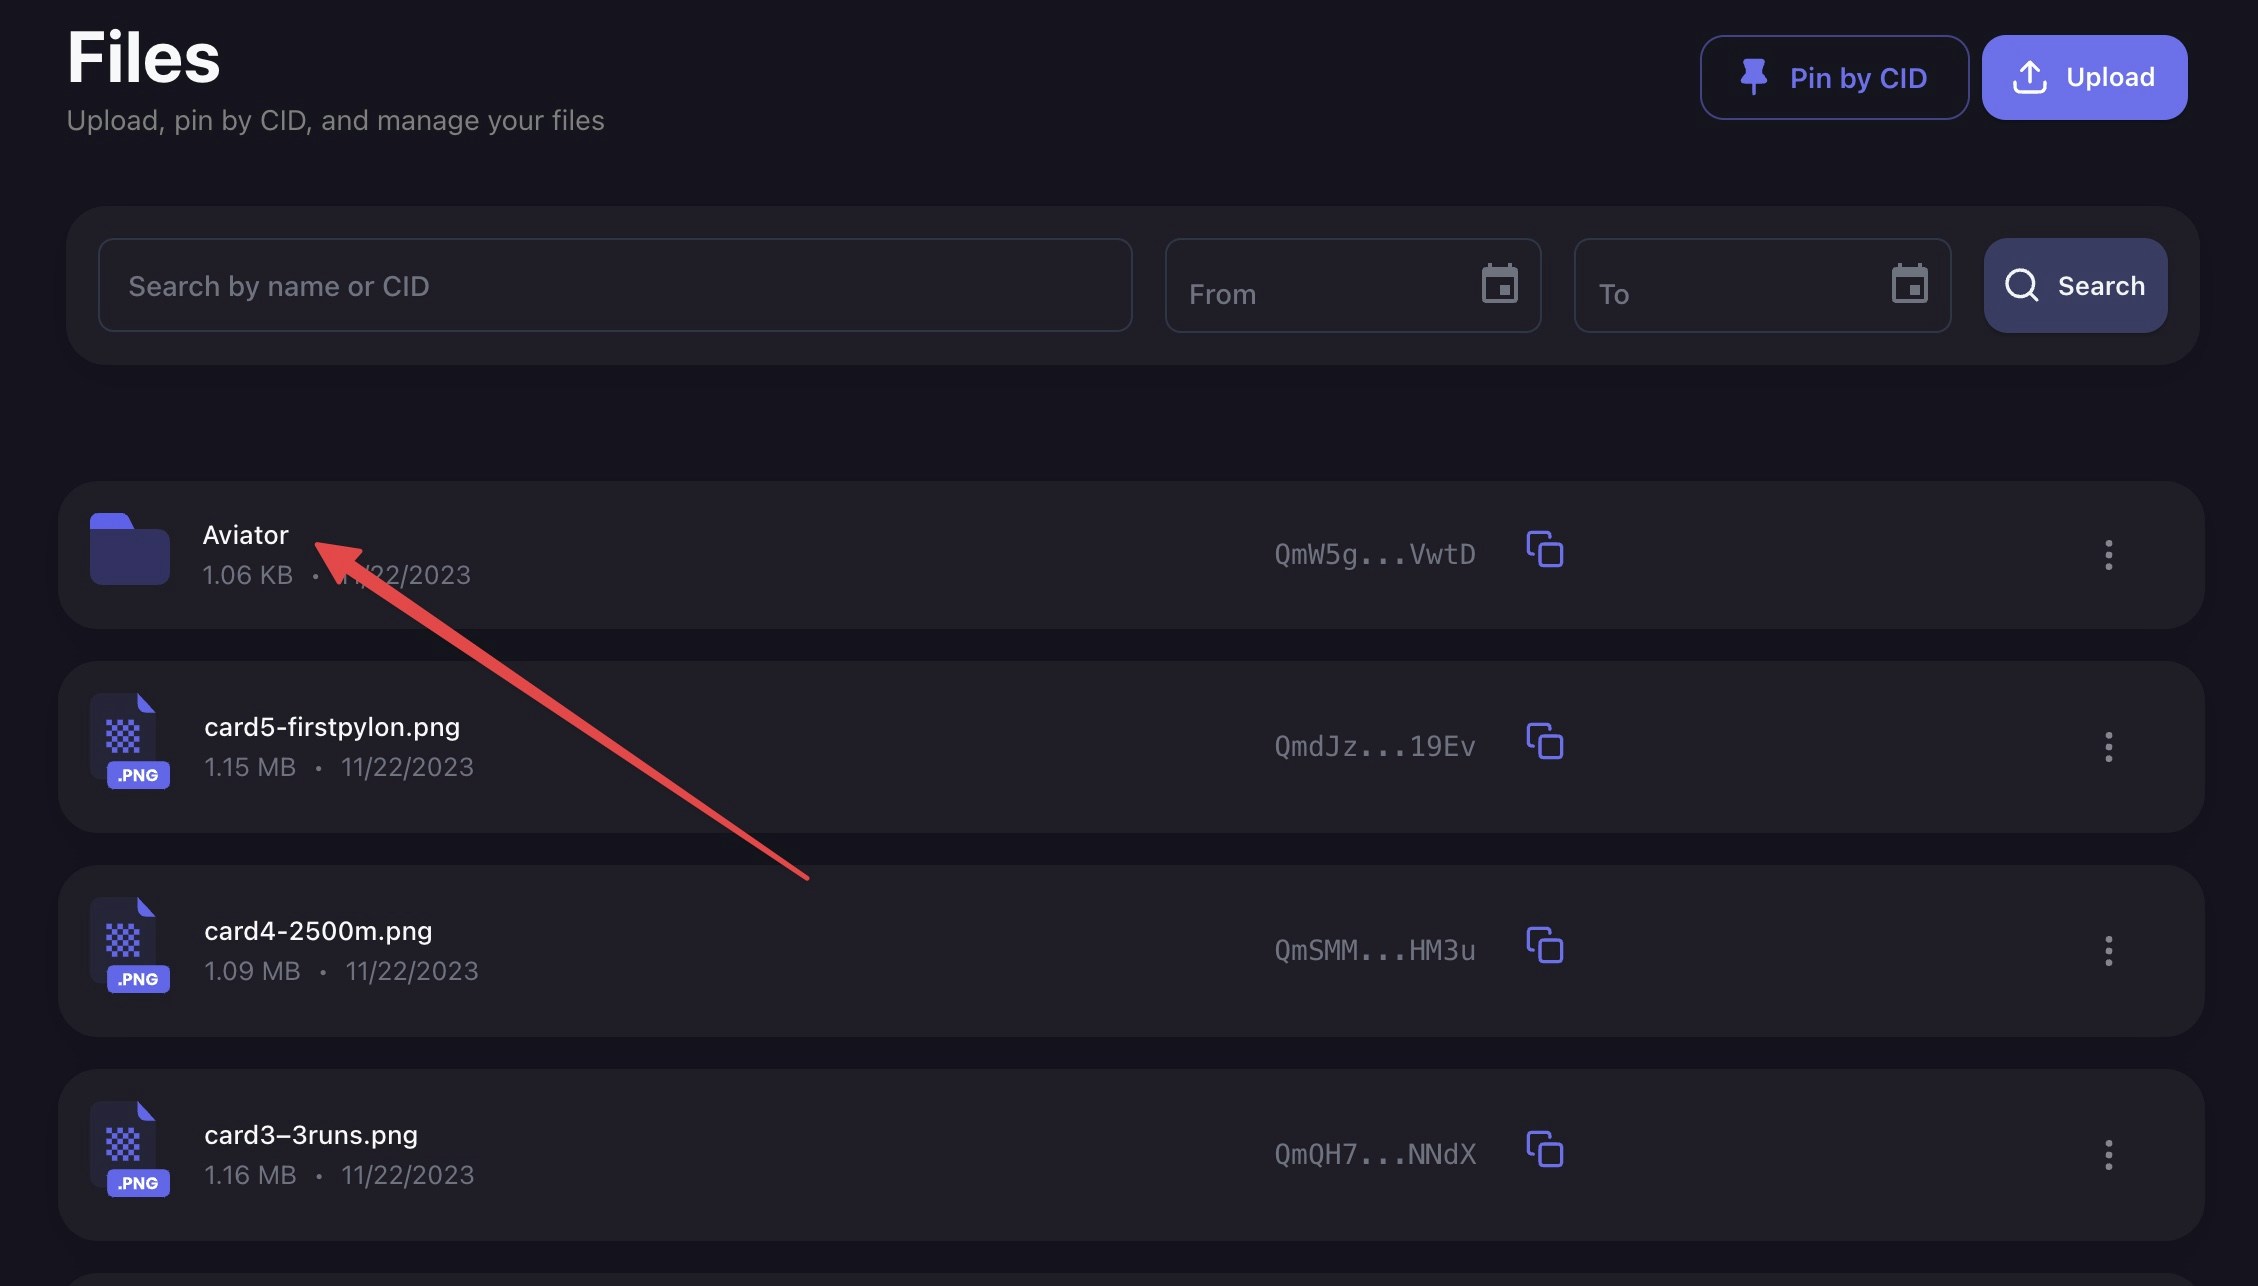
Click on name of the folder you created on Pinata. This will open a new tab showing all your uploaded JSON files. Copy the URL of this folder.
## Step 4: Get the Folder URL
Click on name of the folder you created on Pinata. This will open a new tab showing all your uploaded JSON files. Copy the URL of this folder.
 ## Step 5: Set Up on Sequence Builder
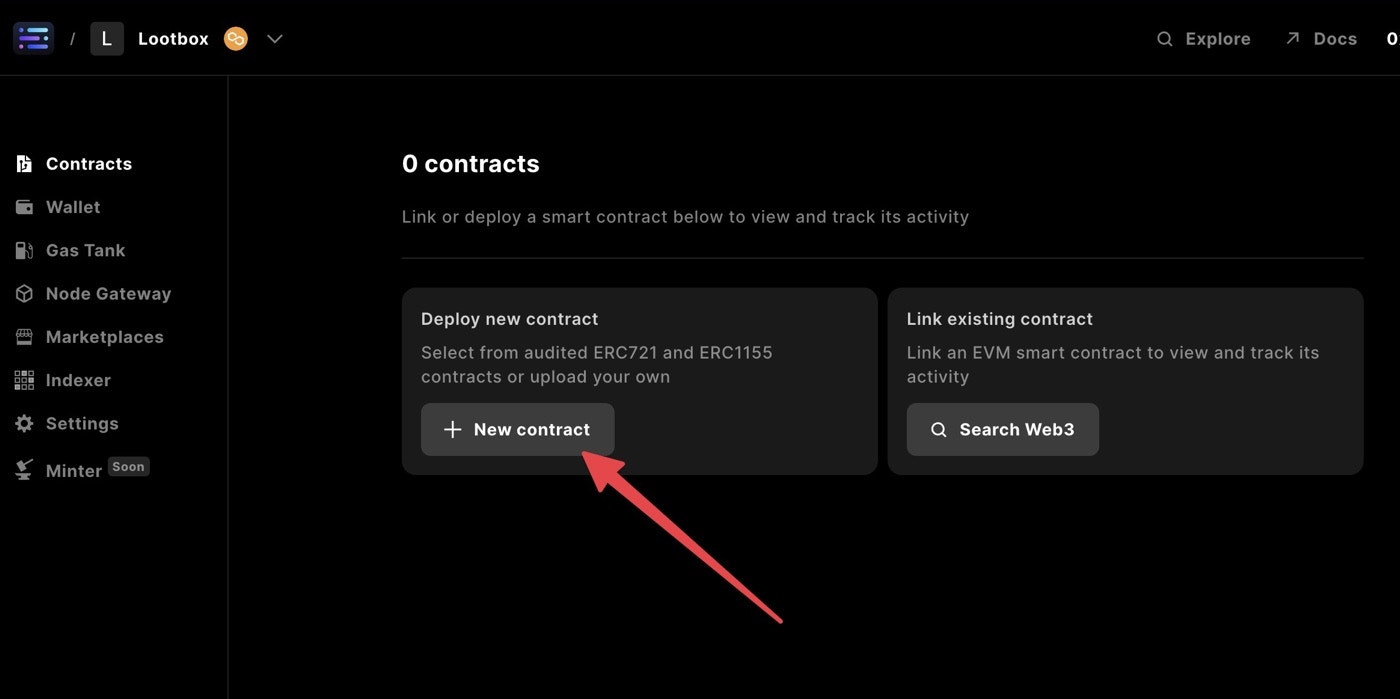
Navigate to [Sequence Builder](https://sequence.build/), set up your account, and create your project on the network of your choice. In the Contracts section, click on "Deploy New Contract".
## Step 5: Set Up on Sequence Builder
Navigate to [Sequence Builder](https://sequence.build/), set up your account, and create your project on the network of your choice. In the Contracts section, click on "Deploy New Contract".
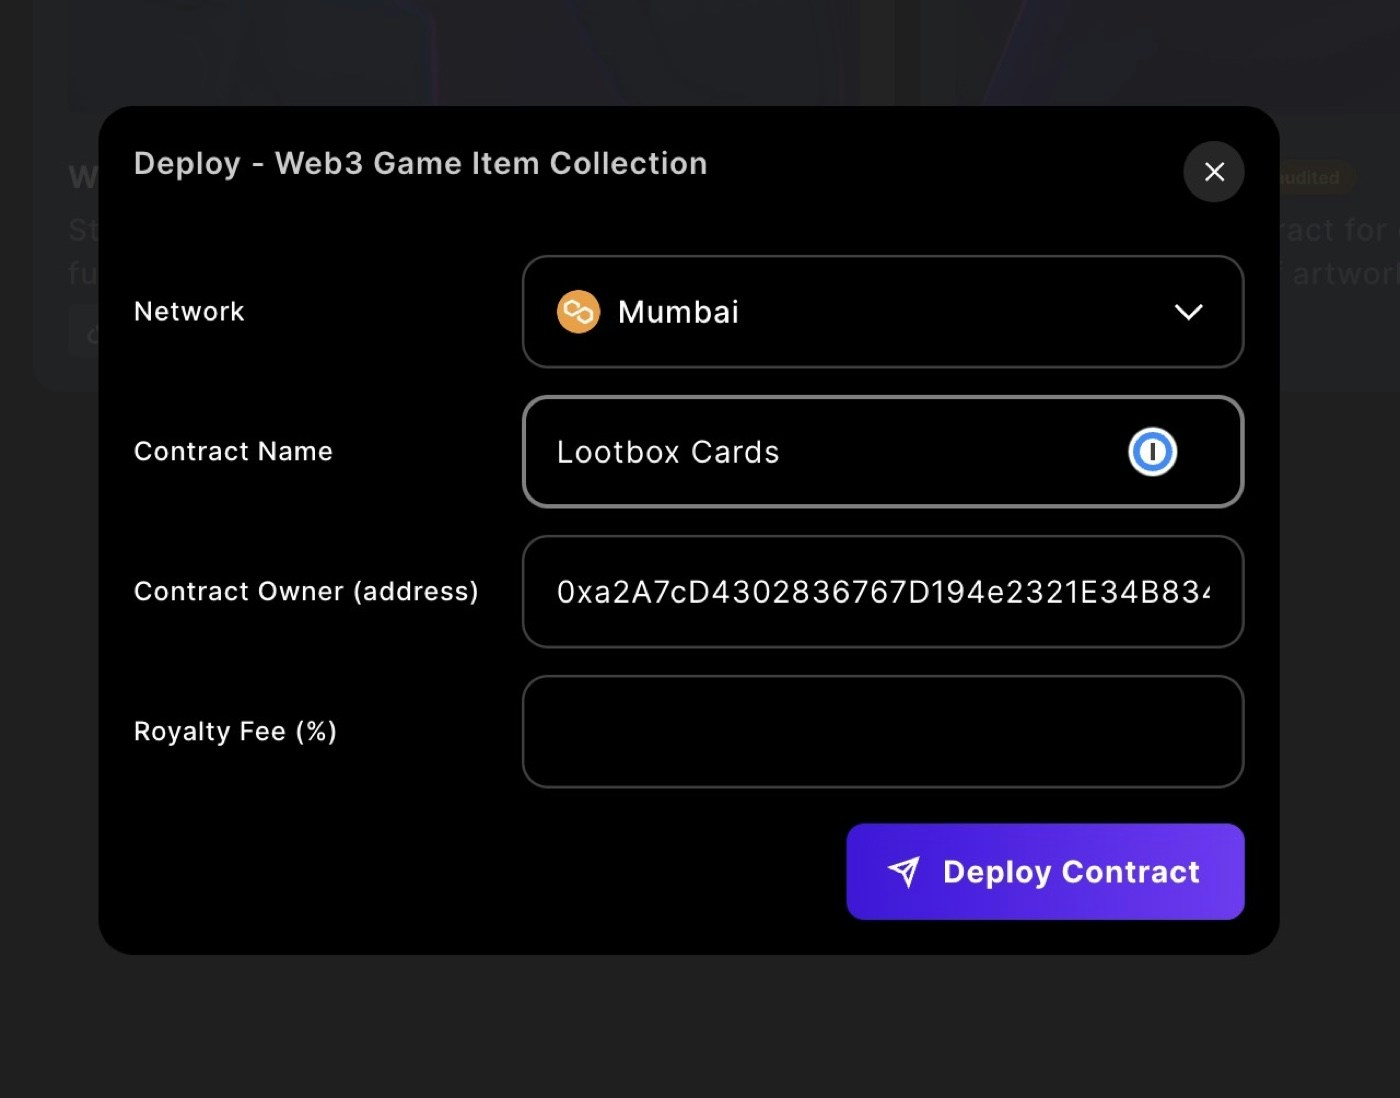
 ## Step 6: Deploy Your Contract
Select "Web3 Game Item Collection (ERC-1155)" and name your contract. Sequence Builder will automatically deploy your contract on-chain.
## Step 6: Deploy Your Contract
Select "Web3 Game Item Collection (ERC-1155)" and name your contract. Sequence Builder will automatically deploy your contract on-chain.
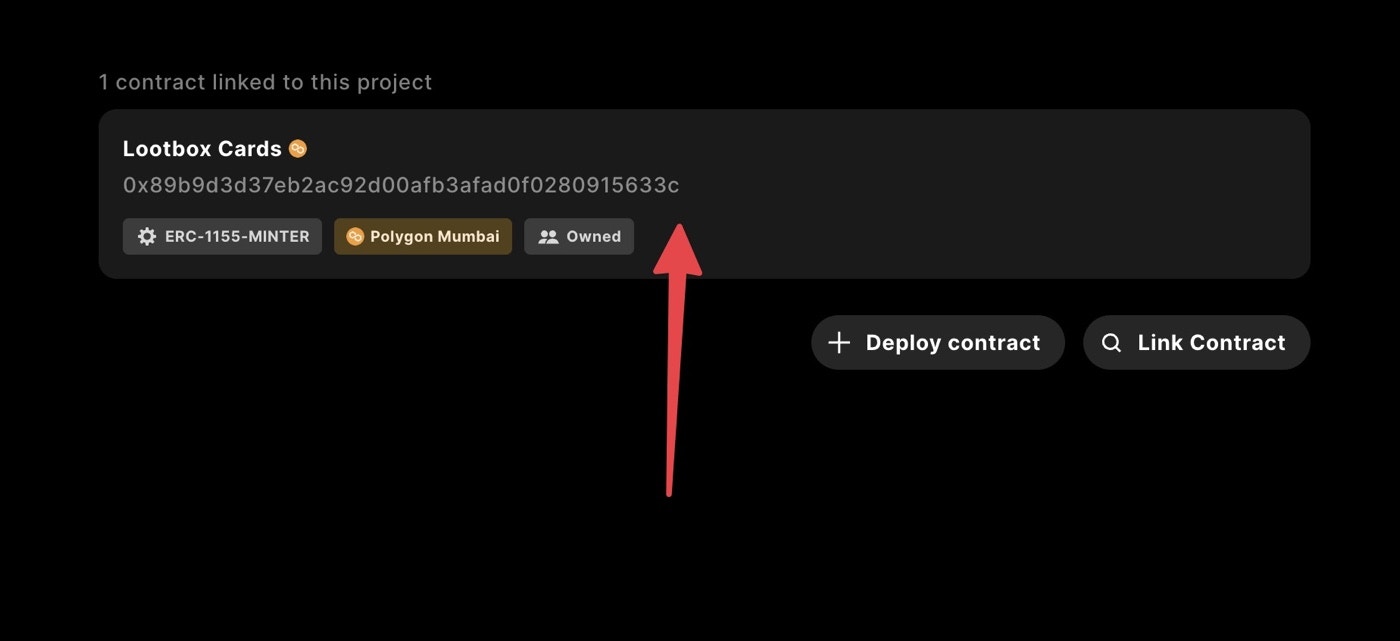
 ## Step 7: Move to Contract Details
Once you sign the transaction, your contract is ready! Click on it to view the details screen.
## Step 7: Move to Contract Details
Once you sign the transaction, your contract is ready! Click on it to view the details screen.
 ## Step 8: Update Contract Attributes
Navigate to the “Write Contract” section. This is where you can modify attributes of your freshly deployed ERC-1155 contract. Two methods are what you should focus on for now:
* `setBaseMetadataURI` allows the creator to set the base metadata URL for this contract. You want this to point to the JSON files you’ve created, depending on NFT ID.
* `mint` mints one of your tokens and sends it to an address of your choosing.
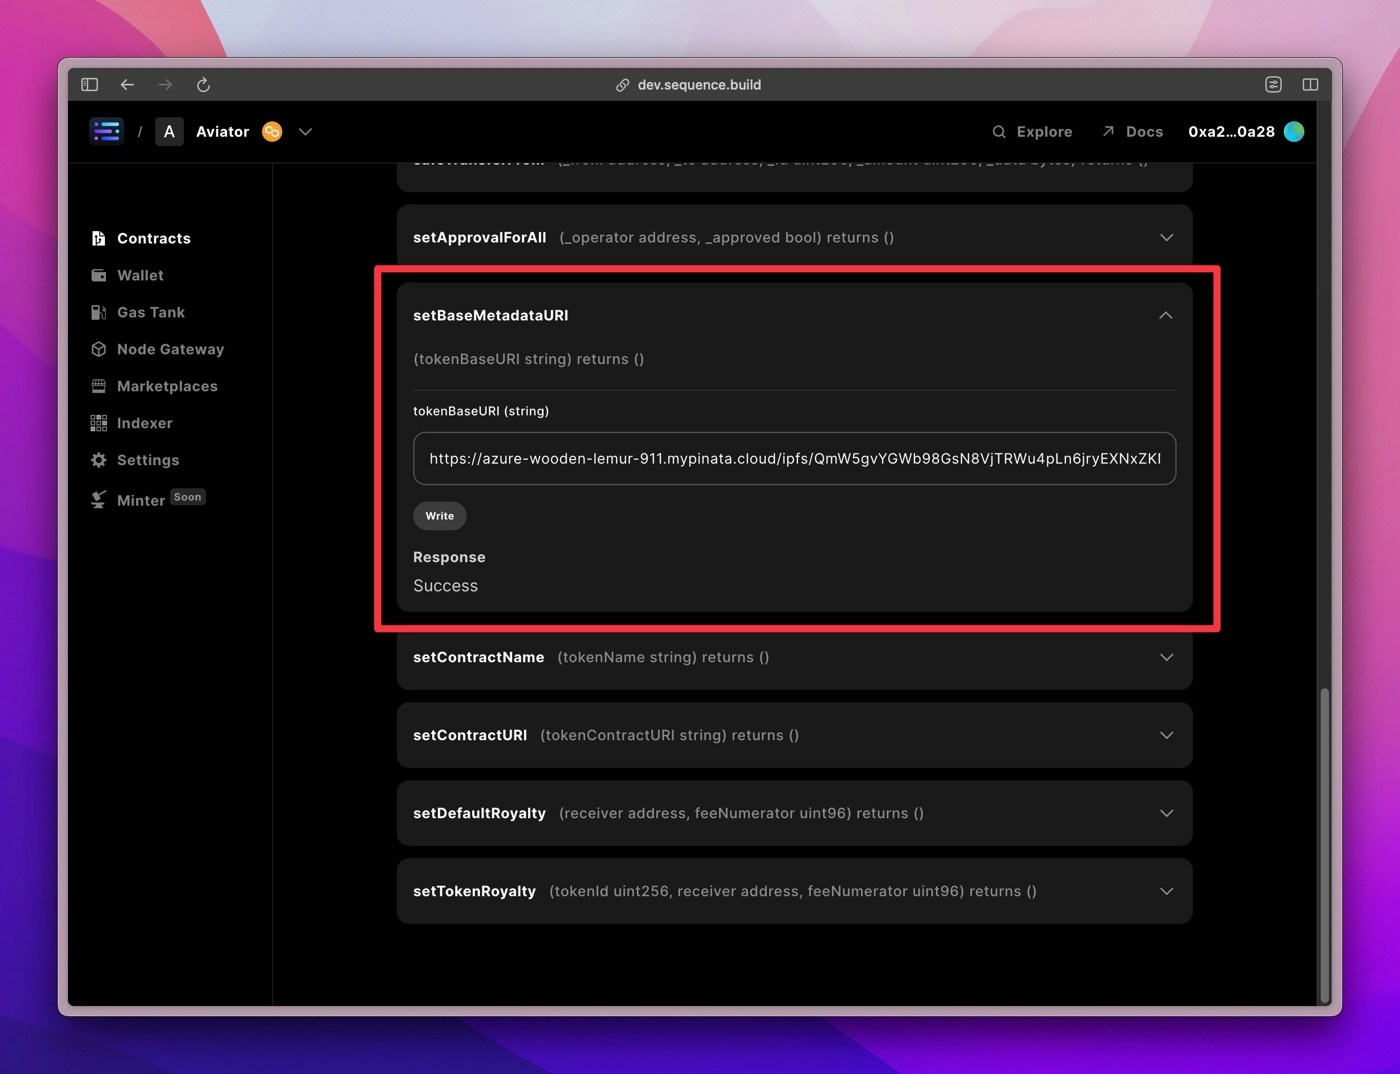
## Step 9: Set the Base Metadata URI
Scroll to `setBaseMetadataURI`, expand it, and under `tokenBaseURI` paste the URL for the JSON folder preview you got from Pinata earlier. It should look something like this:
```
https://azure-wooden-lemur-911.mypinata.cloud/ipfs/QmW5gvYGWb98GsN8VjTRWu4pLn6jryEXNxZKNWpPhVwtDm/
```
Click “Write” and you will be prompted to sign again. This will modify the contract on-chain to set the metadata base. Essentially any token ID you provide will be appended to this URL, along with the `.json` suffix. So if you mint token ID 123, it will look for `tokenBaseURI + 123.json`.
## Step 8: Update Contract Attributes
Navigate to the “Write Contract” section. This is where you can modify attributes of your freshly deployed ERC-1155 contract. Two methods are what you should focus on for now:
* `setBaseMetadataURI` allows the creator to set the base metadata URL for this contract. You want this to point to the JSON files you’ve created, depending on NFT ID.
* `mint` mints one of your tokens and sends it to an address of your choosing.
## Step 9: Set the Base Metadata URI
Scroll to `setBaseMetadataURI`, expand it, and under `tokenBaseURI` paste the URL for the JSON folder preview you got from Pinata earlier. It should look something like this:
```
https://azure-wooden-lemur-911.mypinata.cloud/ipfs/QmW5gvYGWb98GsN8VjTRWu4pLn6jryEXNxZKNWpPhVwtDm/
```
Click “Write” and you will be prompted to sign again. This will modify the contract on-chain to set the metadata base. Essentially any token ID you provide will be appended to this URL, along with the `.json` suffix. So if you mint token ID 123, it will look for `tokenBaseURI + 123.json`.
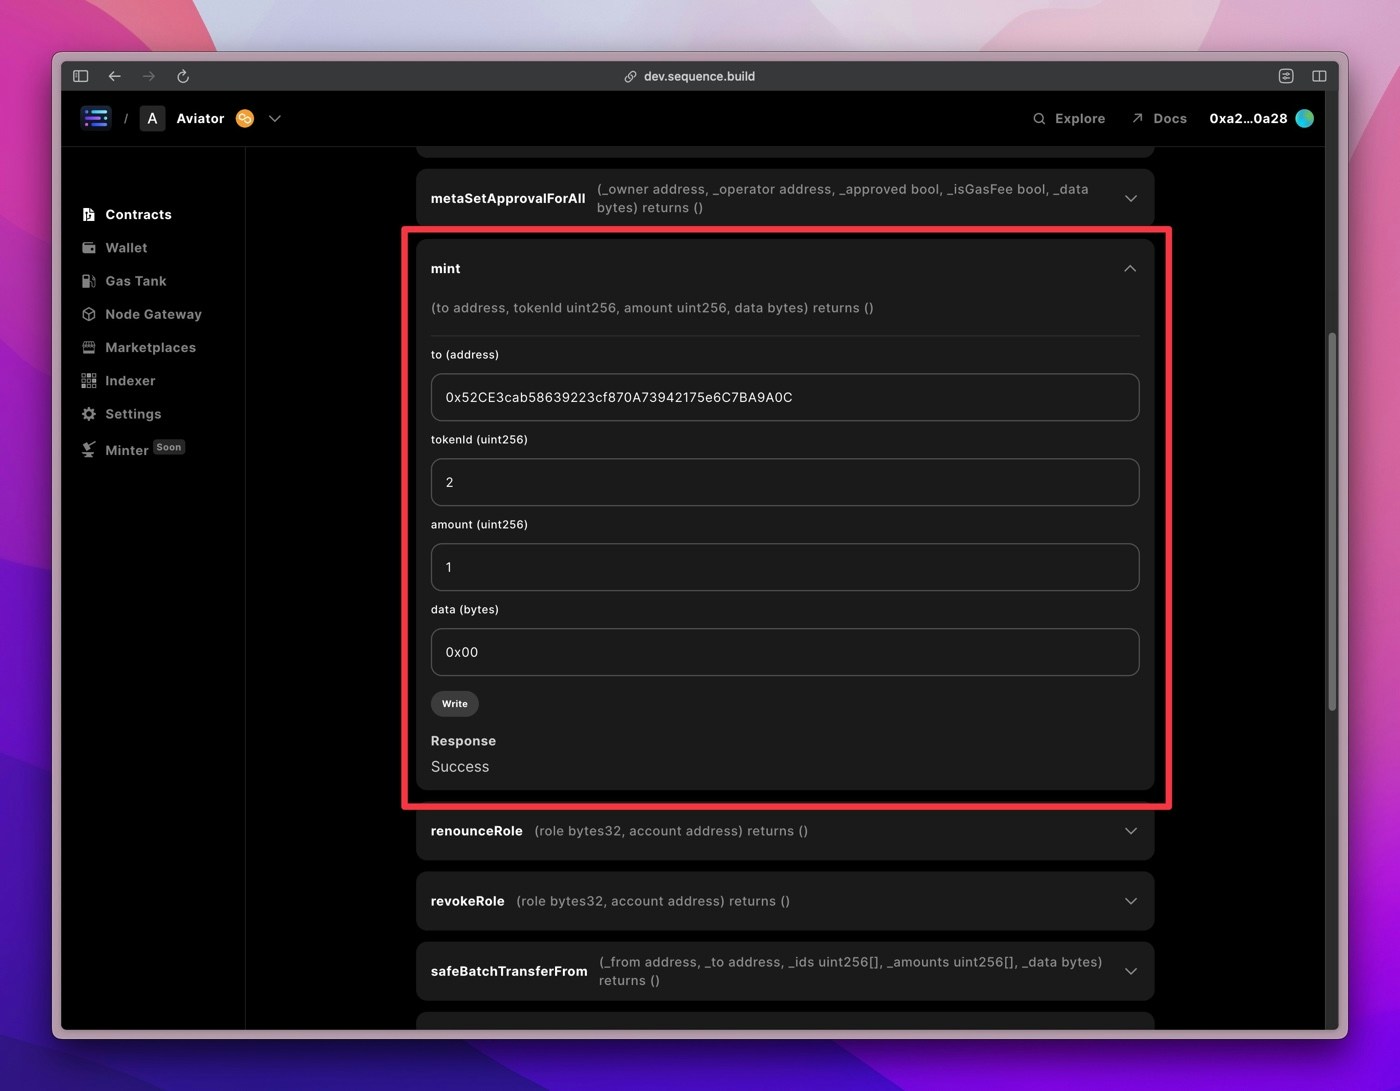
 ## Step 10: Minting Time
Finally, it's time to mint! Scroll up to `mint`, expand it, and fill in the details:
* `to (address)`: This is the address that the token will be sent to. Use your Sequence wallet address or any other valid address.
* `tokenId (uint256)`: This is your token ID. As long as you have a `tokenId.json` file already uploaded to pinata.cloud under the folder, it will work.
* `amount (uint256)`: The number of tokens to mint (usually 1).
* `data (bytes)`: Enter `0x00` for this simple process.
## Step 10: Minting Time
Finally, it's time to mint! Scroll up to `mint`, expand it, and fill in the details:
* `to (address)`: This is the address that the token will be sent to. Use your Sequence wallet address or any other valid address.
* `tokenId (uint256)`: This is your token ID. As long as you have a `tokenId.json` file already uploaded to pinata.cloud under the folder, it will work.
* `amount (uint256)`: The number of tokens to mint (usually 1).
* `data (bytes)`: Enter `0x00` for this simple process.
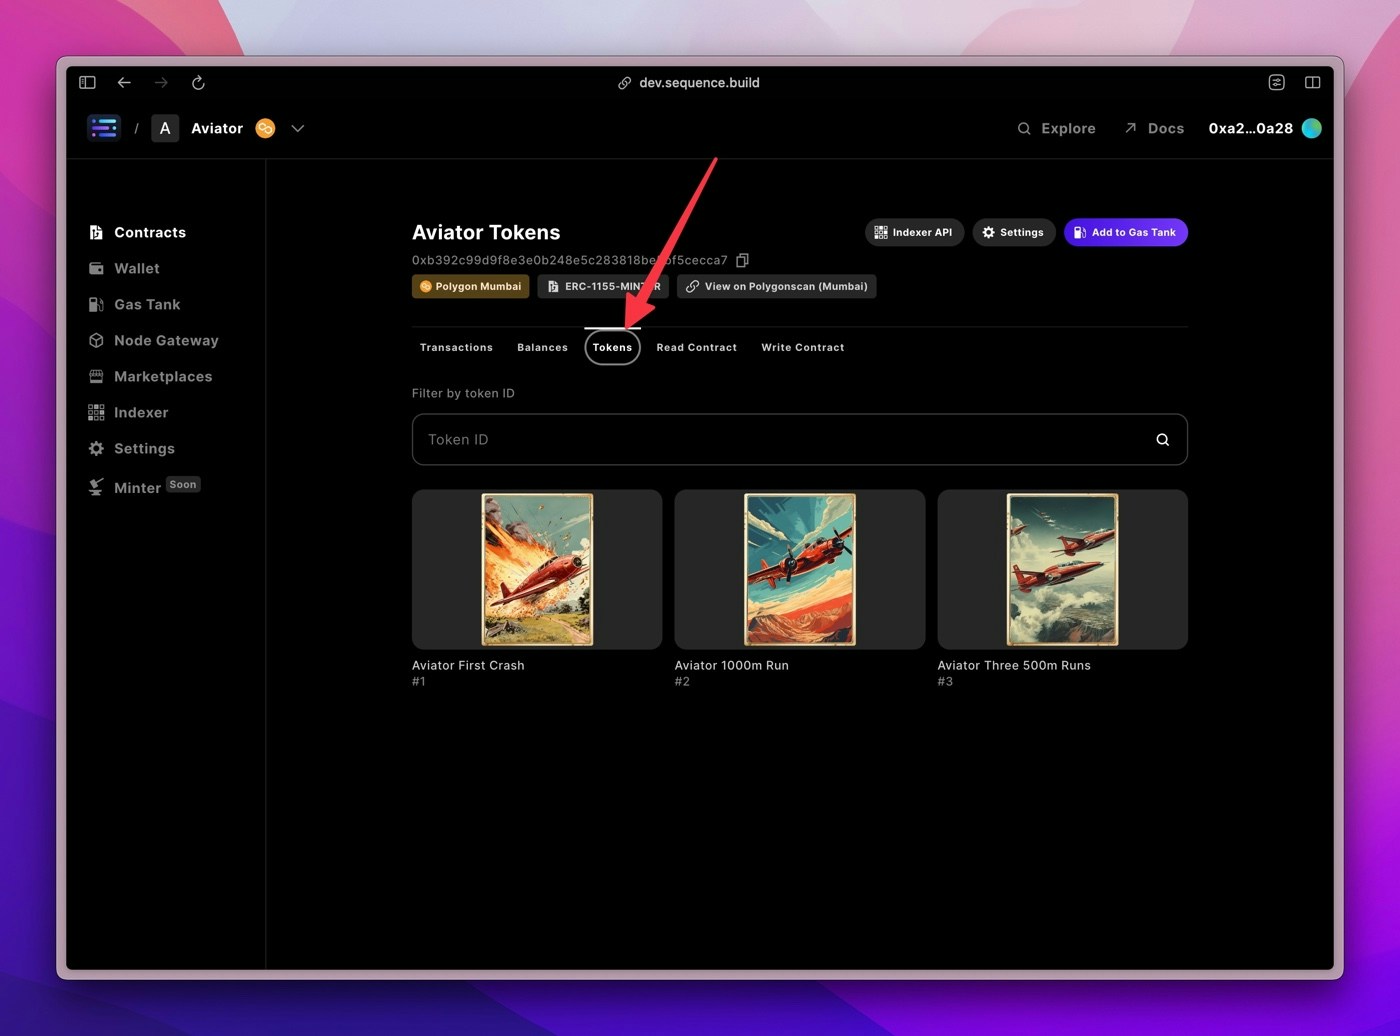
 ## Step 11: Finalize and Admire
Click "Write" and sign the transaction. Congratulations, you've just minted a token! Head over to the "Tokens" section to see your minted tokens with their names and images.
## Step 11: Finalize and Admire
Click "Write" and sign the transaction. Congratulations, you've just minted a token! Head over to the "Tokens" section to see your minted tokens with their names and images.
 ## Step 12: Updating Metadata
If you make mistakes with the token metadata, you can always update it and then call the Sequence Metadata refresh endpoint to reload the specific tokens:
```
curl -X GET "https://metadata.sequence.app/tokens/mumbai/0xb392c99d9f8e3e0b248e5c283818be5bf5cecca7/1/refresh"
```
This is in the format: `https://metadata.sequence.app/tokens////refresh`
Now that you are ready to mint, you might want to read about [how you can launch your own serverless endpoint for securely minting tokens](/guides/mint-collectibles-serverless).
## Step 12: Updating Metadata
If you make mistakes with the token metadata, you can always update it and then call the Sequence Metadata refresh endpoint to reload the specific tokens:
```
curl -X GET "https://metadata.sequence.app/tokens/mumbai/0xb392c99d9f8e3e0b248e5c283818be5bf5cecca7/1/refresh"
```
This is in the format: `https://metadata.sequence.app/tokens////refresh`
Now that you are ready to mint, you might want to read about [how you can launch your own serverless endpoint for securely minting tokens](/guides/mint-collectibles-serverless).